Check out this page if you are interested in the steps involved in creating image makers.
For more information on the components of image makers, please click the link below.
【Basics】Basic knowledge on image makers
目次 / Contents
Steps to create Image Makers
These are the general steps involved in creating image makers.
1.Create image maker
┌ 2.Add and set up parts
│ 3.Add layers
│ 4.Add colors
│ 5.Add items
└ 6.Upload images related to items
7.Rearrange layers
8.Release
Layers, colors, and items should be added for each part.
This means you must repeat Step 2 (Add and set up parts) to Step 6 (Upload images related to items) for the number of parts in your image maker.
Adding and Sorting layers
A part is always composed of one or more layers.
Layers can be rearranged regardless of the part’s orders.
Basically, you will not have to add layers yourself since they will automatically be formed when you add on a part.
However, you may need several layers depending on what kind of image maker you want to make.
When do I need to add layers?
Let’s say you want to create an image maker which looks like the picture below.
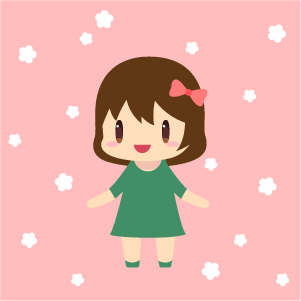
You want to create hair parts with the following conditions.
You want the hair parts to be like this:
- When an item is selected, the front hair and back hair are changed simultaneously
- Front hair are placed in front of the Body Part
- Back hair is placed behind the Body Part
Problems with a single layer
If the front hair and back hair are drawn on a single layer, they cannot be placed separately in front and back of the Body Part.
However, if the front hair and back hair are created into two separate parts, the items will have to be selected separately and cannot be changed at once.
This is what you should do in this case.
Please pay attention to the pink line extending from the Hair Part.
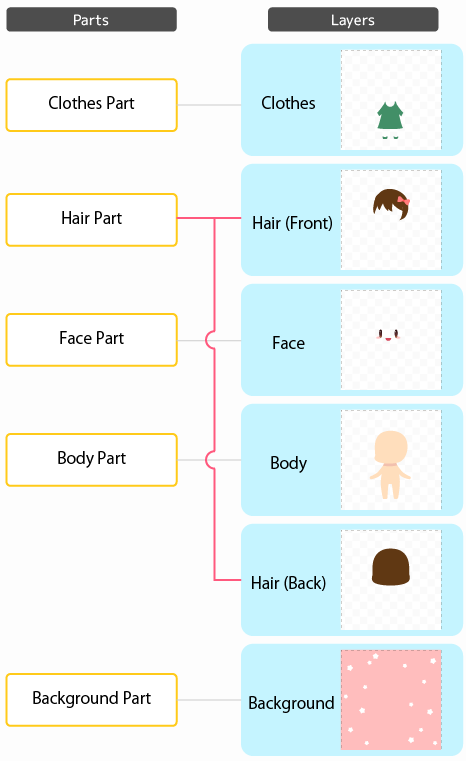
First, add an additional layer to the Hair Part so that it has two layers: a Hair (Front) layer and a Hair (Back) layer.
Then, rearrange the layers so the Hair (Front) Layer comes in front and the Hair (Back) Layer comes behind the Body Part.
By following these steps, you will be able to do the following;
- When an item is selected, the front hair and back hair are changed simultaneously
- Front hair are placed in front of the Body Part
- Back hair is placed behind the Body Part
What happens if you add layers and colors?
You can also add colors as well as layers to a part.
The number of Item Images you need to upload is decided by the number of layers and colors you choose.
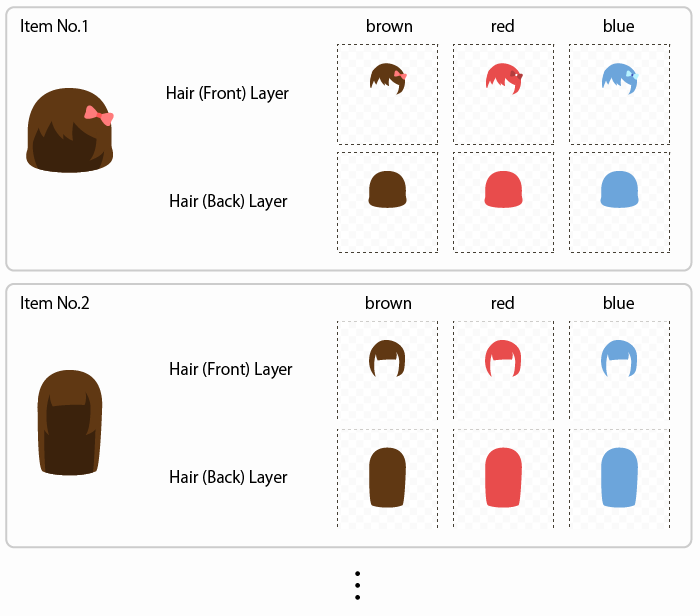
Let’s say you want to add some colors to the Hair Part in the previous example.
You have chosen two layers: Hair (Front) Layer and Hair (Back) Layer.
You have chosen three colors: brown, red, and blue.
As you can see below, you need to prepare“the number of layers × the number of colors“ of Item Images for each item.
Summary
The correlation of parts, layers, colors, and items may seem complicated at first.
Adding more layers or colors means uploading more Item Images, and may increase your burden.
You can always add the details afterward, so we recommend that you start simply with one layer and one color.