If you have finished making the images, it’s finally time to create your Animal Icon Maker with Picrew Creator.
目次 / Contents
Create a new image maker
To create a new image maker, enter a name and select Dress-Up Maker.
Choose a simple and easy name for now, as it can be changed later.
Add and setup parts
Add parts
Add the following parts.
| Part Name | Type |
| Hat Part | Standard |
| Eye Part | Standard |
| Mouth Part | Standard |
| Ear Part | Standard |
| Face Part | Standard |
| Background Part | Standard |
Part settings
Set up the parts as below.
Items that are not on the table should not be changed.
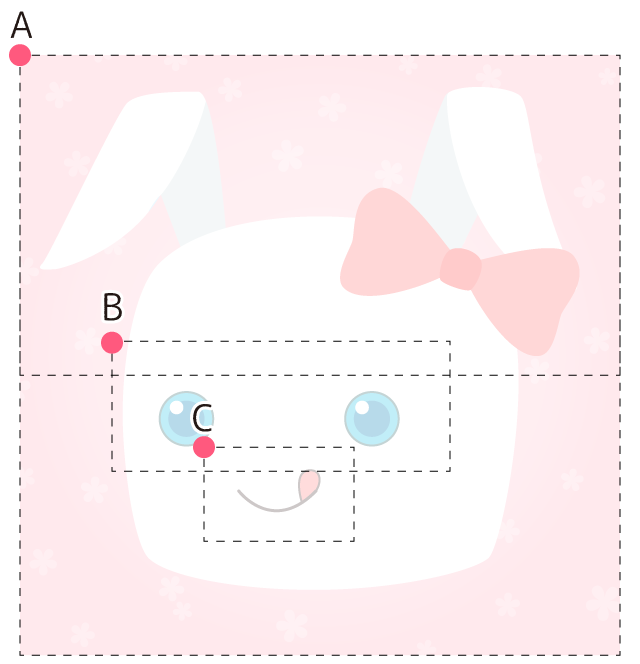
| Parts | ● | Position X | Position Y | Up-Down movement | Left-Right movement | Change size | Rotation |
| Hat | A | 0px | 0px | ON | ON | − | ON |
| Eyes | B | 92px | 286px | ON | − | − | − |
| Mouth | C | 184px | 392px | ON | ON | ON | − |
| Ears | A | 0px | 0px | − | − | − | − |
| Face | A | 0px | 0px | − | − | − | − |
| Background | A | 0px | 0px | − | − | − | − |
A reference diagram of the upper left position ● for each part.
Add layers
The Ear Parts are composed of two layers.
Add one layer to the Ear Part.
Add colors
There are three color variations for the Face Part and Ear Part.
Add two colors to make a total of three colors.
Add and setup items
Add items
Enter and add the necessary number of items.
An item will automatically be registered when you create a new part, so add the necessary number minus one.
For this example, all parts should have three items, so you must add two.
Upload Item Images
When you have finished adding the items, upload the Item Images.
Reference:【Function】Upload Item Images
Upload Item Icons
Upload Item Icons that correspond to the Item Images.
An Item Icon must be prepared for each item.
Only one icon can be registered for each item regardless of color variations. We recommend that you register the icon’s most typical color.
Item Images can be used directly as the Item Icons by using the cropping function.
However, in this example, the image of the Ear Part cannot be used directly as an Item Icon because it has two layers. You need to create an Icon Image separately from the Item Image.
Reference:【Function】Upload Item Icon Images
Preview
Once all the images have been uploaded, don’t forget to check the preview screen.
The preview screen is like the actual player’s screen, and you can check the image maker’s operations.
Make sure the items are positioned correctly and not overlapped, etc.
Edit Image Maker Details
If your preview screen looks good to go, let’s get ready to publish your image maker.
| Name of your image maker | Name your piece of work |
| Description | Write a brief description of the image maker and how you want it to be played. |
| Image Maker Icon | icrew’s top page.The image should be simple so that the players can get an idea of what the generated images would be like. |
| Permitted uses | Select the permission scope of your image maker. Any other requests to the users should be notified in the description section. |
Release
Now your Animal Icon Maker is ready to be published.
To reflect the setup and allow the players to play with your image maker in Picrew, you have to “release” it.
This applies to other items and settings that you may add in the future. Please note that the changes you have made will not be reflected in Picrew unless you “release” them (there are a few exceptions)
【Function】Releasing image makers
Now your Animal Icon Maker can be played on Picrew!
Try it out and share it on social media.
Great job!